Arterial lines, commonly referred to as “A-lines,” are a type of catheter that is inserted into a patient’s artery for more accurate and precise blood pressure monitoring. The arterial line is connected to a transducer that will transmit a pressure waveform and its corresponding values to a monitoring system. While these invasive lines may be placed in multiple sites, including the radial, brachial, axillary, femoral, and dorsalis-pedis arteries, the preferred site is the radial artery.
One of the primary reasons a clinician would use an arterial line is to be able to accurately titrate vasoactive medications. This is especially important when the patient requires more than one vasoactive medication. The arterial line allows the clinician to see a continuous blood pressure reading and will allow for more prompt response time to drip titrations. Direct pressure readings, when properly obtained by leveling and zeroing the line, have a decreased potential for inaccuracies in measurement compared with a standard blood pressure cuff measurement. It also eliminates potential error for inaccurately sized cuffs which skew the readings and also help to eliminate the inaccuracies of cuff pressures caused by high SVR and low flow states.
Other advantages to having an arterial line are that patients who require frequent ABGs do not need to be continually stuck for blood samples, as these samples can be drawn directly from the line itself. The arterial line also functions as an alternative trigger source for intra-aortic balloon pumps in the case that an ECG lead may become disconnected from the patient.
Basic Components
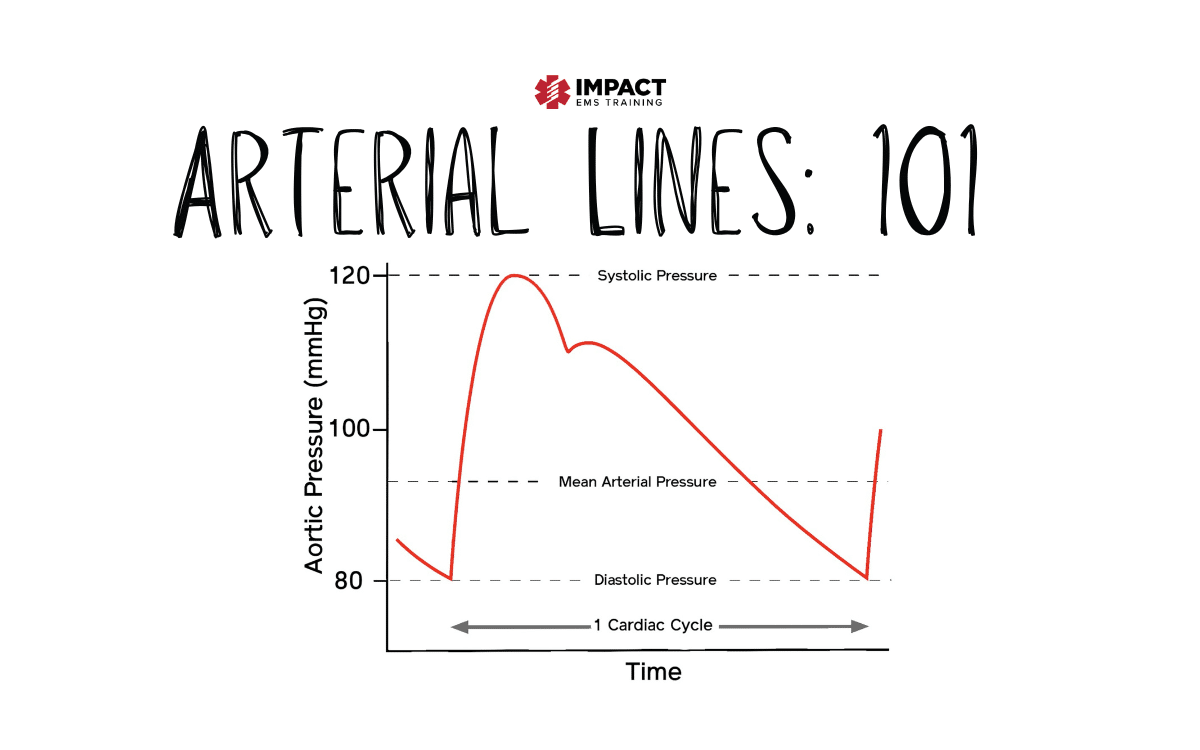
Components of the a-line waveform include systole, diastole, systolic pulse pressure, diastolic pulse pressure, mean pressure, and the dicrotic notch. The dicrotic notch, which happens to be my favorite part of this waveform, (Is it weird to have a favorite part of a waveform, asking for a friend?) is a brief increase in aortic pressure that is reflected by a slight increase in the downward waveform caused by the sudden closure and rapid spring back of the aortic valve leaflets. This notch is the beginning of diastole.

Leveling and Zeroing
I cannot stress how important this step is. You may have the most beautiful waveform showing on your monitor screen, but if you don’t level you’re a-line correctly and zero with EVERY position change and EVERY altitude change, the numbers reflected could be drastically inaccurate.
Leveling
First, we’ll start with leveling. The transducer should be leveled at the phlebostatic axis. This is at the level of the patient’s atrium that is located at the 4th intercostal space, mid-chest. In the hospital setting, this should be fixated to a securing device, but in the transport world is often taped, securely, to the patient’s side. If you are transporting this patient by ground or by air and you secure this properly the first time, you should not have to readjust this position. Wise words from John Wooden “If you don’t have time to do it right, when will you have time to do it again?”
Every inch that the transducer is leveled above the phlebostatic axis, the reading will be 1.86 mm Hg less than the true pressure. Inversely, for every inch the transducer is leveled lower than the phlebostatic axis, the reading will be 1.86 mm Hg greater than the true pressure. That number may seem small, but it can make a big difference when titrating medications.
Zeroing
Zeroing is achieved by opening the transducer to atmospheric air to obtain a baseline of the atmospheric pressure. This will eliminate any effect atmospheric pressure would have on the transducer. Zeroing should be done immediately with set up of the line, when transferring from one monitor to another, any time the displayed pressure is questionable, and with any change in elevation. For those working in aeromedical, it is important to communicate with your pilot about altitude changes and to confirm when you reach cruising altitude.
The Square Wave Test
Normal
The Square Wave Test will allow you to know if your a-line is under or overdampened which will negatively affect the accuracy of the readings. First, you should ensure that your pressure bag is inflated to 300 mm Hg and that all air was removed from the bag upon the initial setup. If this was not done, especially if transporting the patient by air, please ensure all air is removed from the bag prior to transporting the patient. (Think Boyle’s law).
Next, you can pull on the fast-flush feature on the transducer to elicit the square wave test. When you pull on the fast-flush feature you should see a rapid upstroke, followed by a flat line, and then a quick descent followed by one to two oscillations, or bounces, and then quickly return to a normal waveform.


Overdamping
Overdamping is noted when there are poorly defined waveforms on the monitor. Slurred upstrokes will be noted along with decreased systolic pressures and increased diastolic pressures. After performing a square waveform test zero to one oscillation, or “bounce” as I like to think of them, will be noted. Causes of overdamping can be excessive tubing length, blood clots, air bubbles, or kinks in the tubing or catheter, the use of nonrigid tubing, or loose connections in the tubing or transducer. One of the most common causes of overdamping is kinking of the a-line catheter near the insertion site. If this is the case it may be necessary to remove the dressing to fix the kink and then reapply a new one.

Underdamping
The damping coefficient is how quickly the system comes to a rest. It is a way to measure the shock-absorbing capability of the transducer. In the case of underdamping, there is less shock-absorbing capability which does not allow for the system to come to rest between cardiac cycles. This causes part of the previous waveform to be included into the beginning of the next waveform, resulting in a falsely elevated systolic pressure and a falsely lowered diastolic pressure. Using the square waveform test, after the rapid descent, multiple rapid oscillations, or bounces, will be noted. The most efficient way to correct underdampening is to adjust the frequency response through the monitor. Other possibilities to correct this waveform are to ensure that the tubing between the transducer and the catheter does not exceed 48 inches, and check for small air bubbles in the tubing.

References
Lopez, O. (2011). Back to basics: Critical care transport certification review. Place of publication not identified: Xlibris.
Marino, P. L., & Gast, P. (2014). The ICU book. Philadelphia: Wolters Kluwer/Lippincott Williams & Wilkins.
McEvoy, M., Rabrich, J. S., & Murphy, M. (2018). Critical care transport (2nd ed.). Burlington, MA: Jones & Bartlett Learning.
Impact EMS offers accredited certification and refresher courses in one trusted location. Fully prepare for certification exams and maintain licensure with skill building credits.